
Streamline medical assistance with high quality photos
In medical situations, the higher the quality of information available to our medical experts, the more accurate our diagnoses and assistance will be.
Vital signs can be an important part of patient assessment, as are photographs, if there are any visible conditions.
By providing high-quality information and images from the initial contact with us, you can streamline communication and ensure swift, effective assistance from our teams. Within this guide our medical team provide four key tips for taking high quality photos.
Starting Point for Taking Medical Photos
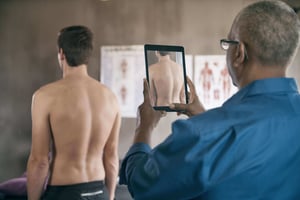
1. Context Shots
- The first photo should always be a context shot, showing the whole patient with an emphasis on the face and body language. This provides an overall view of the patient's condition.
2. Focus and Exposure
- Ensure the photo is in focus. Avoid using shallow depth of field or "Portrait mode."
- The photo should not be underexposed or overexposed. Use tools like a histogram or zebra stripes to balance the exposure.
- Use natural light and avoid heavy shadowing. Flash should be avoided as it can create harsh lighting.
3. Angles and Composition
- Do not take photos at a 90-degree angle to the object. Instead, take photos at a 45-degree angle. Capture up to four photos from different 45-degree viewpoints to provide a comprehensive view.
4. Special Considerations for Specific Areas
- Inside the Mouth: Use a tongue depressor to hold down the tongue. Ensure the light source is either behind the camera or use two separate light sources at different angles. Avoid using the phone's torch as the light source.
- Eyes and Close-Ups: Use macro mode (often indicated by a flower symbol) for close-up shots of the eyes or other small areas.
- Taking photos of a rash: Take one of the whole body part/s affected from a distance to gauge the distribution of the rash, then close up images (in focus, can use macro setting) to see the exact nature of the lesions.
- Joints and limbs: Take photos of both sides together e.g. of both ankles so that the viewer can see the normal side and compare to the abnormal side.
Further Practical Tips
- Perspective: Include an object of known size, for example a ruler or a pen next to a laceration, to help our teams judge size.
- Steady Hands: Keep your hands steady to avoid blurry images. If possible, use a tripod or rest your hands on a stable surface.
- Multiple Shots: Take multiple photos to ensure you have at least one clear and well-lit image.
- Review and Retake: Always review the photos before sending them. If they are not clear or well-lit, retake them.
By following these simple guidelines, you can help our medical team to provide effective assistance.
Improve the Quality of Patient Assessment
MedAire/MedSea clients can streamline the process of sending medical information like photographs and vital signs, alongside the required patient information with the Digital Assessment Kit / Maritime MediKit.
These kits contain medical grade equipment combined with a handy patient assessment app to save time for the responder and ensure that our medical professionals are provided with the best possible information.
Luxury Yachts clients can find out more here | Commercial Maritime clients can find out more here